Connecting to a network
Before you begin
If your organization needs to comply with Payment Card Industry Data Security Standard or PCI DSS regulations, then connecting to a wireless network or other public internet connection is not permitted in these environments. Please check with your IT and security teams.
Physical cabled network connections
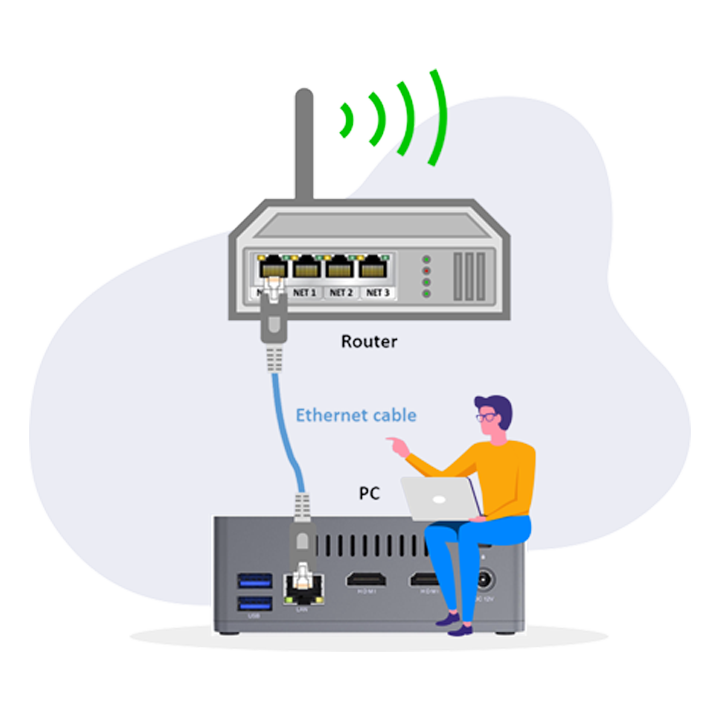
If you are unable to connect to a wireless network due to your companies IT security policy, then you will need to plug your PC directly into your network router using an Ethernet cable as shown in the diagram below:
Simply plug one end of the Ethernet cable into one of the ports on the back of your router, and the other end of the Ethernet cable into the port on the back of your PC or on your laptop. The network will configure automatically and you will then be connected.
Sound Fix
Fix sound problems in Windows 10
If you’re having audio problems, the following suggestions might help.
The tips are listed in order, so start with the first one, see if that helps, and then continue to the next one if it doesn’t.
The audio troubleshooter might be able to fix audio problems automatically.
To run the troubleshooter
- In the search box on the taskbar, type audio troubleshooter, select Fix and find problems with playing sound from the results, then select Next.
- Select the device you want to troubleshoot and then continue through the troubleshooter.
You can also launch the troubleshooter from audio Settings. Select Start > Settings > System > Sound > Troubleshoot.
If running the troubleshooter doesn't help, continue to the next tip.
To check for updates
- Select Start > Settings > Update & Security > Windows Update > Check for updates.
- Do one of the following:
- If the status says "You're up to date, go to the next tip.
- If the status says "Updates are available," select Install now.
- Select the updates you want to install, then select Install.
- Restart your PC and see if your sound is working properly.
If that didn't solve your problem, continue to the next tip.
Try these steps
- Check your speaker and headphone connections for loose cords or cables. Make sure all cords and cables are plugged in.
- If you have multiple 5mm jacks to plug into, especially on a surround sound system, make sure all cords and cables are plugged into the correct jack.
- If it’s not clear which jack goes with which cord, consult your hardware manufacturer, or try the most obvious outputs one at a time and see if they work.
Note: some systems use a green jack for output and pink for mic input and others will be labeled "headphone" or "microphone."
- Make sure power is turned on and check the volume level.
- Make sure the mute setting is not turned on, and try turning up all the volume controls.
- Remember some speakers and apps have their own volume controls. Be sure to check them all.
- Try connecting your speaker and headphones to a different USB port.
- It's possible that your speakers won't work when your headphones are plugged in. Unplug your headphones and see if that helps.
If your cables and volume are OK, see the next sections for additional troubleshooting.
Check to make sure your audio devices aren't muted and haven't been disabled.
- Right-click the Speakers icon on the taskbar, and then select Open Volume mixer.
- You’ll see a set of volume controls for your devices. Make sure none of them are muted. If any of them are muted, you’ll see a red circle with a line through it next to the volume control. In that case, select the volume control to unmute.
- Check your device properties to make sure that your devices have not been disabled by mistake. Select Start > Settings > System > Sound .
- Select your audio device, and then select Device properties. Be sure to select Device properties for both the output and input devices.
- Make sure the Disable check box is cleared for the output and input devices.
If that didn't solve your problem, continue to the next tip.
Hardware problems can be caused by outdated or malfunctioning drivers. Make sure your audio driver is up to date and update it if needed. If that doesn't work, try uninstalling the audio driver (it will reinstall automatically). If that doesn't work, try using the generic audio driver that comes with Windows. If you're having audio issues after installing updates, try rolling back your audio driver.
To update your audio driver automatically
- In the search box on the taskbar, type device manager, then select it from the results.
- Select the arrow next to Sound, video and game controllers to expand it.
- Right-click the listing for your sound card or audio device, such as headphones or speakers, select Update driver, then select Search automatically for updated driver software. Follow the instructions to complete the update.
If Windows doesn't find a new driver, look for one on the device manufacturer's website and follow those instructions. If that doesn't work, try uninstalling your audio driver.
To uninstall your audio driver
- In the search box on the taskbar, type device manager, then select it from the results.
- Select the arrow next to Sound, video and game controllers to expand it.
- Right-click the listing for your sound card or audio device, select Uninstall device, select the Delete the driver software for this device check box, and then select Uninstall.
- Restart your PC.
- Note: Be sure to save documents and any other current work before you restart.
- This restart will automatically prompt your PC to reinstall your audio driver.
- To restart, select Start > Power > Restart .
If those options didn’t work, try using the generic audio driver that comes with Windows.
To use the generic audio driver that comes with Windows
- In the search box on the taskbar, type device manager, then select it from the results.
- Select the arrow next to Sound, video and game controllers to expand it.
- Right-click the listing for your sound card or audio device, then select Update driver > Browse my computer for driver software > Let me pick from a list of device drivers on my computer.
- Select the audio device whose driver you want to update, select Next, and follow the instructions to install it.
If these steps didn't solve your audio issue, visit your device manufacturer’s website and install the most recent audio/sound drivers for your device.
If you have audio issues after installing updates
If your audio was working before you ran Windows Update and now isn’t working, try rolling back your audio driver.
To roll back your audio driver
- In the search box on the taskbar, type device manager, then select it from the results.
- Select the arrow next to Sound, video and game controllers to expand it.
- Right-click the listing for your sound card or audio device, then select Properties.
- Select the Driver tab, then select Roll Back Driver.
- Read and follow the instructions and then select Yes if you want to roll back your audio driver.
If rolling back your audio driver didn't work or wasn't an option, you can try to restore your PC from a system restore point.
Restore your PC from a system restore point
When Microsoft installs updates on your system, we create a system restore point in case problems arise. Try restoring from that point and see if that fixes your sound problems. For more info, see "Restore from a system restore point" in Recovery options in Windows 10.
If you're connecting to an audio device using USB or HDMI, you might need to set that device as the default device.
- In the search box on the taskbar, type control panel, then select it from the results.
- Select Hardware and Sound from the Control Panel, and then select Sound.
- On the Playback tab, right-click the listing for your audio device, select Set as Default Device, and then select OK.
If setting your audio device as the default device doesn't help, continue to the next tip for additional troubleshooting.
Note
Not all devices will have audio enhancements.
Sometimes having audio enhancements on can result in audio issues. Disabling them may resolve your issue.
- In the search box on the taskbar, type control panel, then select it from the results.
- Select Hardware and Sound from the Control Panel, and then select Sound.
- On the Playback tab, right-click the Default Device, and then select Properties.
- On the Enhancements tab, select either the Disable all enhancements or the Disable all sound effects check box (depending on which option you see), select OK, and try to play your audio device.
- If that doesn't work, on the Playback tab, select another default device (if you have one), select either the Disable all enhancements or the Disable all sound effects check box (depending on which option you see), select OK, and try to play audio again. Do this for each default device.
If turning off audio enhancements doesn't help, see the next sections for additional troubleshooting.
- In the search box on the taskbar, type services, then select it from the results.
- Select each of the following services, right-click, and then select Restart:
- Windows Audio
- Windows Audio Endpoint Builder
- Remote Procedure Call (RPC)
If restarting these services doesn’t resolve your issue, see the next sections for more troubleshooting.
- In the search box on the taskbar, type control panel, and then select it from the results.
- Select Hardware and Sound from the Control Panel, and then select Sound.
- On the Playback tab, right-click (or press and hold) Default Device, and then select Properties.
- On the Advanced tab, under Default Format, change the setting, select OK, and then test your audio device. If that doesn't work, try changing the setting again.
If trying different audio formats doesn't help, see the next sections for additional troubleshooting.
Many updates require you to restart your device.
To check and see if you have installed updates pending and need to restart
- Save your work and close all open applications.
- Select Start > Power . If you have installed updates pending, you’ll see options to Update and restart and Update and shut down.
- Select one of those restart options to apply the updates
Need help with Windows Update? See Learn how to Troubleshoot problems updating Windows 10.
If restarting doesn't help, see the next section for additional troubleshooting.
Some audio problems might be caused by an issue with the audio system’s IDT High Definition Audio CODEC. This can be fixed with a manual driver update which allows you to choose the sound driver you want to use.
Note: Not all systems will have an IDT High Definition Audio CODEC.
To check and see if you have one, and to manually update the driver
- In the search box on the taskbar, type device manager, then select it from the results.
- Select the arrow next to Sound, video and game controllers to expand it.
- Look for IDT High Definition Audio CODEC. If it's listed, right-click it and select Update driver, then select Browse my computer for driver software > Let me pick from a list of device drivers on my computer.
- You’ll see a list of pre-installed drivers. Select High Definition Audio Device, and then select Next.
- 1. Select Start > Settings > Privacy , and then select Microphone from the left menu.
- Under Allow access to the microphone on this device, select Change. Make sure the toggle is turned On.
- If you’re having this issue with a specific app, scroll down to Choose which Microsoft Store apps can access your microphone and make sure that the toggle next to that app is turned On as well.
Update Antivirus
About this Website
Another important factor in any PC environment is an antivirus and making sure your PC or laptop is protected from the threat of becoming infected by a virus. There are a number of different antivirus solutions available, some being free of charges such as AVG, or Microsoft Windows Defender which is integrated into the Windows operating system. In this article, we are going to discuss configuring the Microsoft Windows Defender solution.
What is Windows Defender?
Windows Defender, which is now called Windows Defender Antivirus in Windows 10 Creators update, is an integrated anti-malware or anti-virus solution that is an integrated component of the Windows operating system.
Configuring Windows Defender Antivirus for Windows 10
In this section, we are going to describe the process for enabling the Windows Defender feature on Windows 10. Follow the steps below to work through the process of enabling and checking Windows Defender:
Click to Zoom
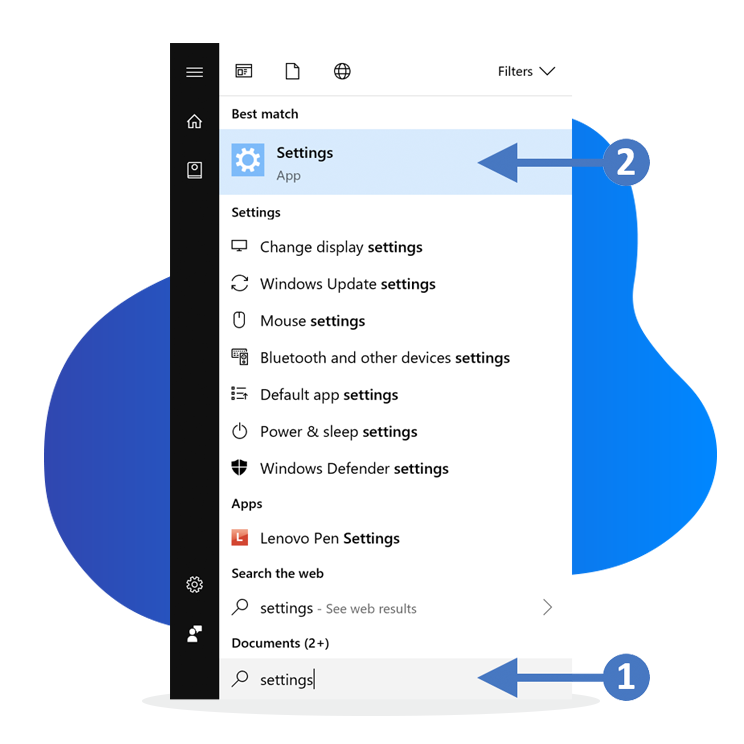
1. Press the Windows key on your keyboard and then start to type in "settings" in the search box highlighted (1). You will then see the Settings App appear at the top of the list as the best match, highlighted (2). Click on the Settings App to launch it as shown in the following screenshot:
Click to Zoom
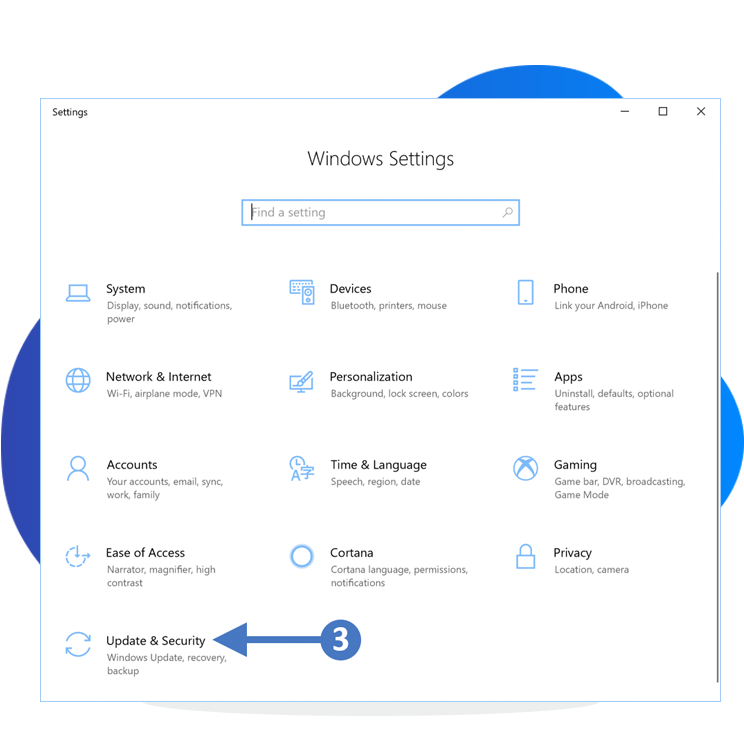
2. You will now see the Windows Settings screen as shown in the following screenshot:
Click to Zoom
3. Now click on System and Security as highlighted (3) in the screenshot above. You will now see the system and security setting as shown in the following screenshot:
Click to Zoom
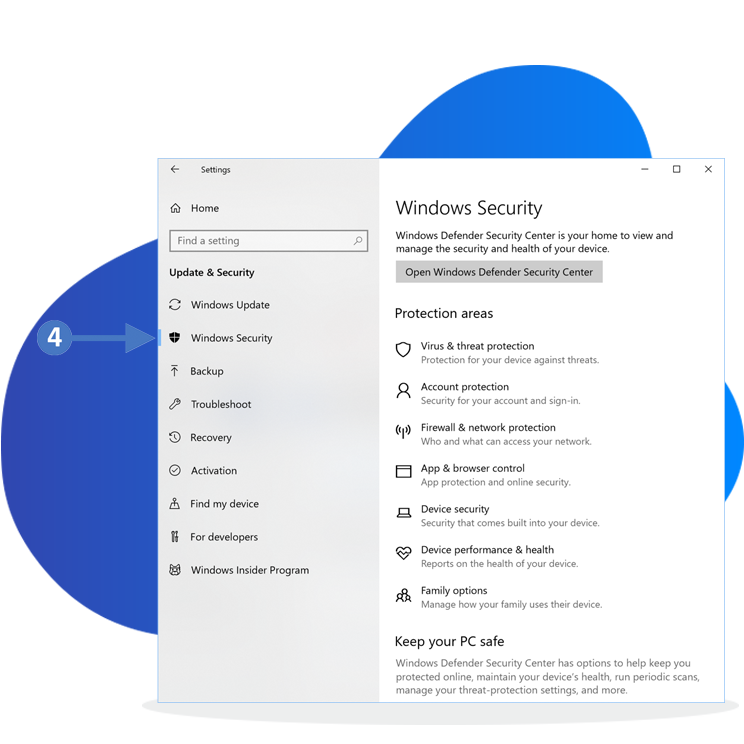
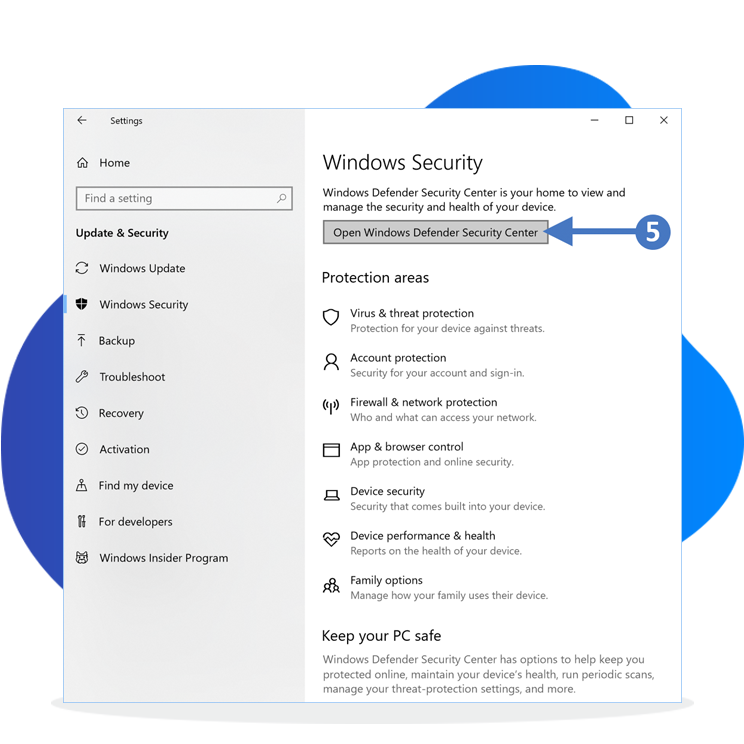
5. Now click on Open Windows Defender Security Center as highlighted (5) in the above screenshot.

Click to Zoom
6. You will now see the Security at a glance screen as shown in the following screenshot:
Click to Zoom
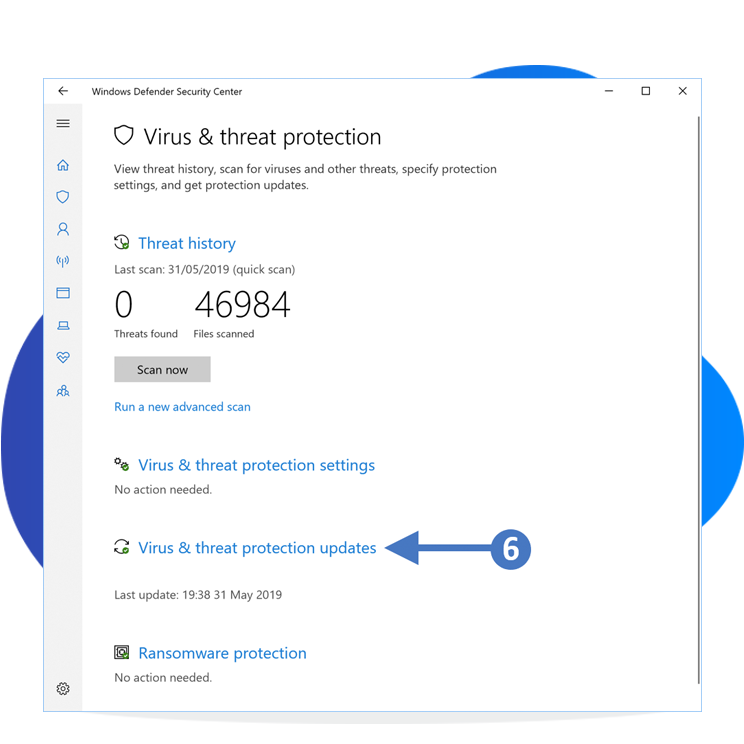
7. You can see from the screenshot that the Virus & threat protection needs no action. This indicates that everything is up to date. If you click on the Virus & threat protection icon you will see the following screenshot:
Click to Zoom
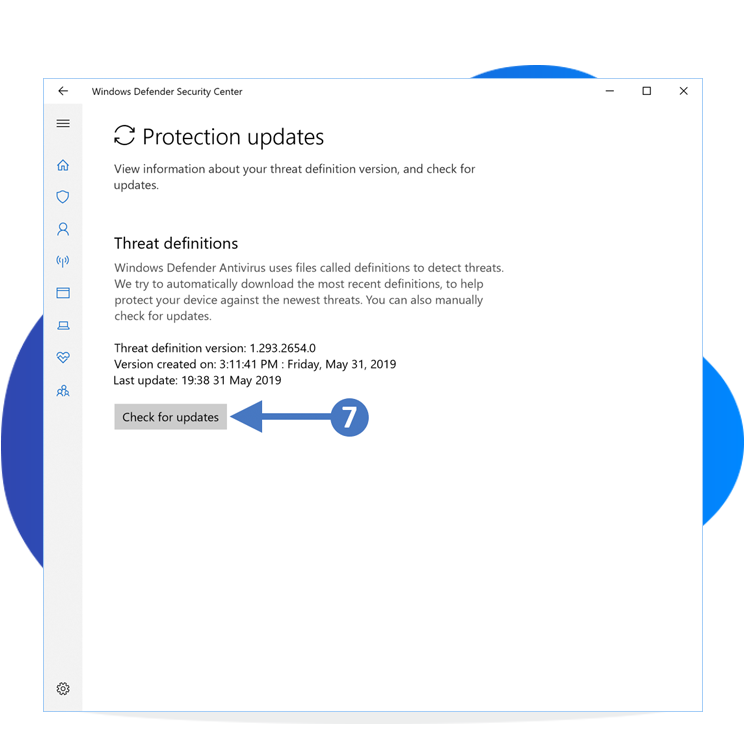
8. To check whether or not you have the latest up to date virus definitions click the Virus & threat protection updates as highlighted (6) in the above screenshot. You will then see the Protection updates screen as shown in the following screenshot:
9. To check for updates click the Check for updates button as highlighted (7) in the above screenshot. Your PC will now check for any updated virus definitions files and download them. You will also be asked to restart the service.
You have now successfully checked that your antivirus is enabled and up to date using Windows Defender for Windows 10.
AVG Free 
If you have AVG free installed on your PC or laptop, then follow the steps below to ensure that it is running the latest versions.
Click to Zoom
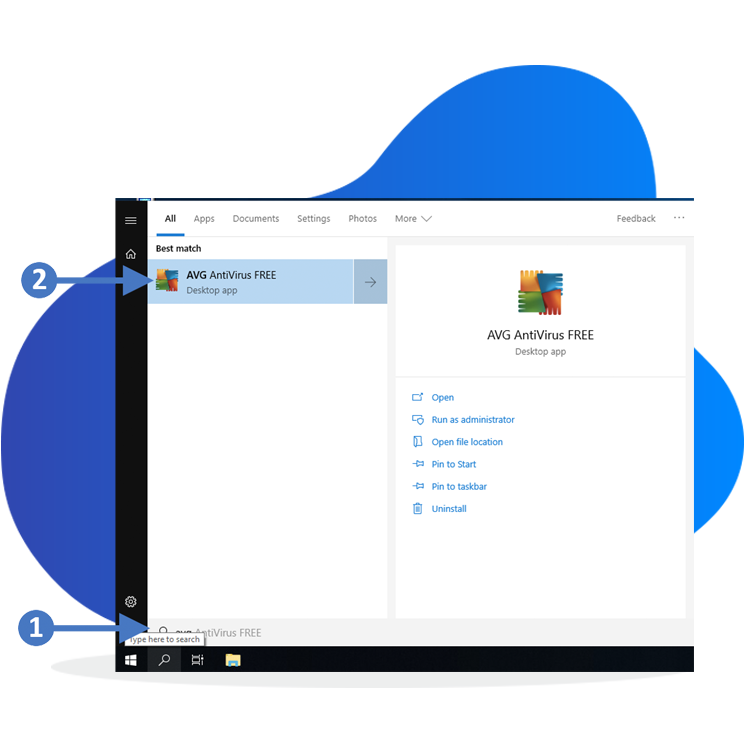
1. Press the Windows key on your keyboard and then start to type in "avg" in the search box highlighted (1). You will then see the AVG Antivirus FREE appear at the top of the list as the best match, highlighted (2). Click on AVG Antivirus FREE to launch it as shown in the following screenshot:

Click to Zoom
2. You will now see the AVG Antivirus Free console screen as shown in the following screenshot:

Click to Zoom
3. Click the refresh icon next to Virus definition highlighted (3) to ensure you have the latest definition files, and then click the SCAN COMPUTER button highlighted (4).
Click to Zoom
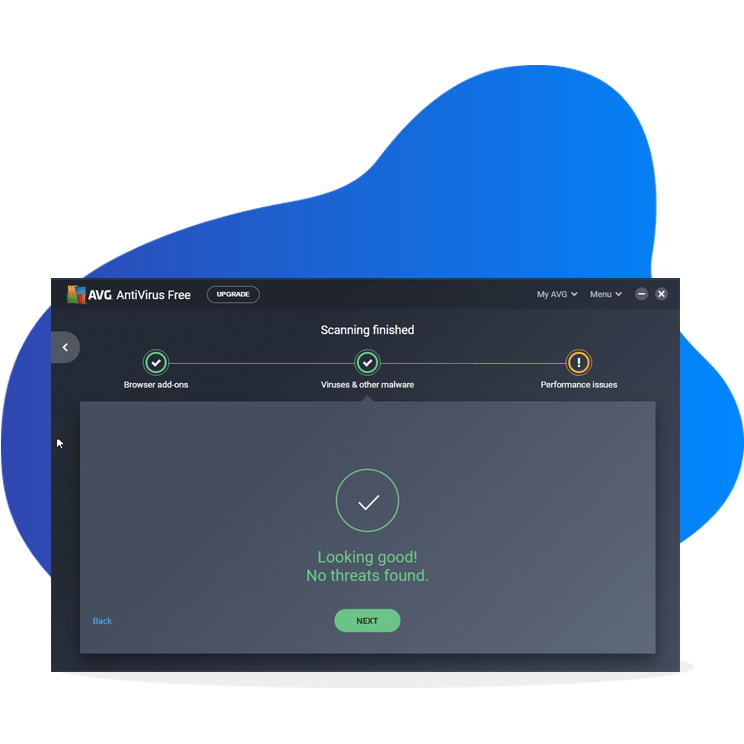
5. Once completed you will see the Scanning finished screen as shown in the following screenshot:
6. Now close the AVG Antivirus console screen/application.
You have now successfully checked that your AVG antivirus is enabled and up to date.
McAfee 
If you have McAfee installed on your PC or laptop, then follow the steps below to ensure that it is running the latest versions.
Click to Zoom
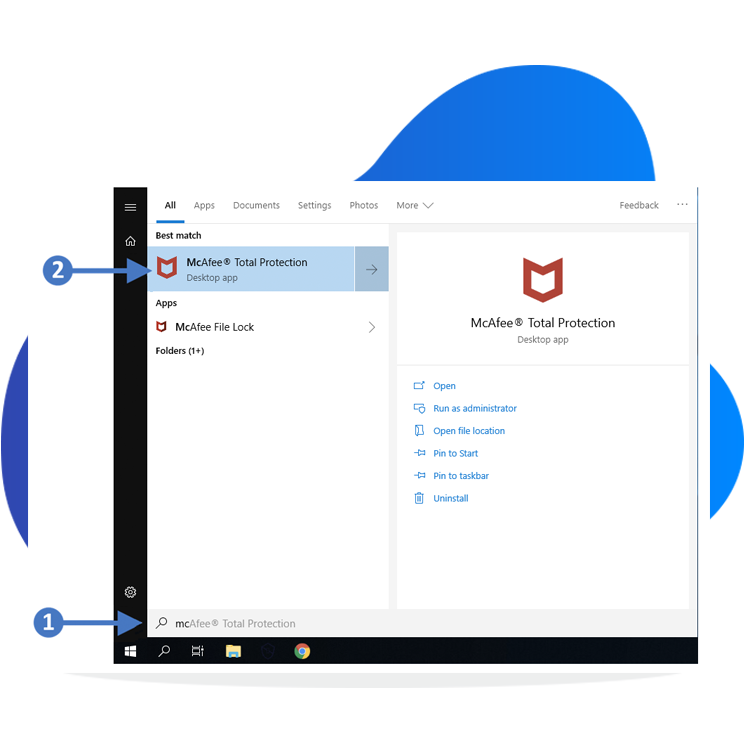
1. Press the Windows key on your keyboard and then start to type in "mc" in the search box highlighted (1). You will then see the McAfee Total Protection appear at the top of the list as the best match, highlighted (2). Click on McAfee Total Protection to launch it as shown in the following screenshot:

Click to Zoom
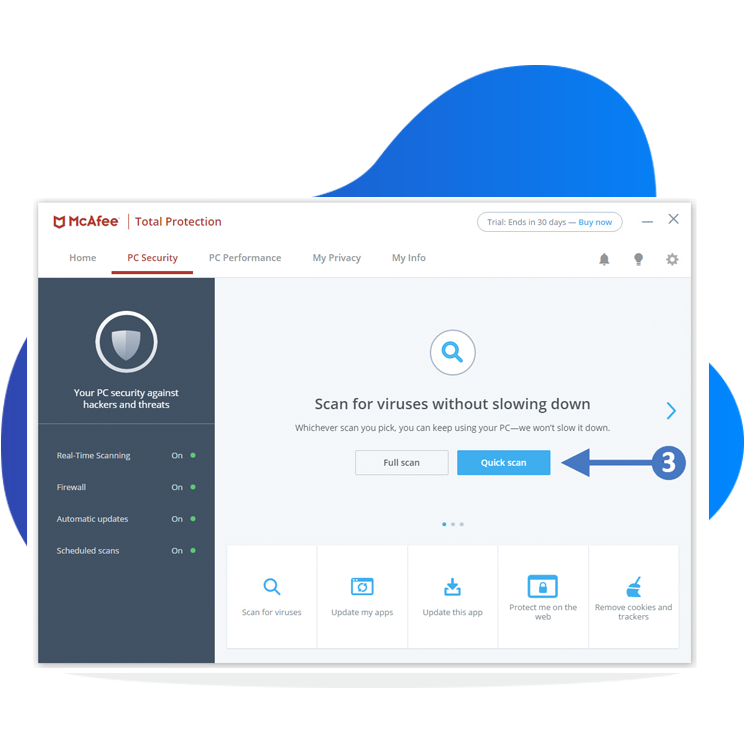
2. You will now see the McAfee console screen as shown in the following screenshot:
Click to Zoom
3. Click PC Security and chose between Full Scan or Quick Scan (3) to start scanning your PC.
Click to Zoom
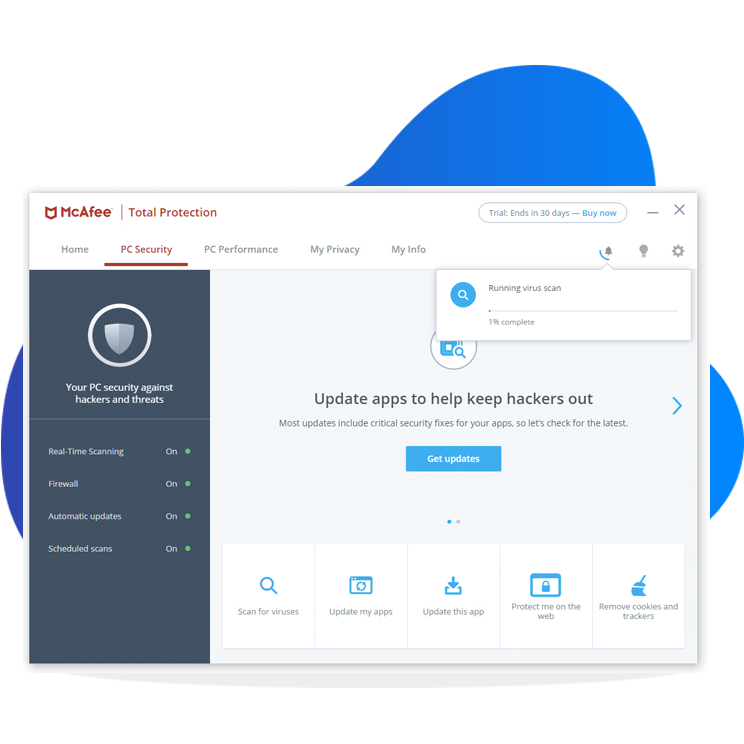
4. You will now see the scan process start, showing the current progress as shown in the following screenshot:
Click to Zoom
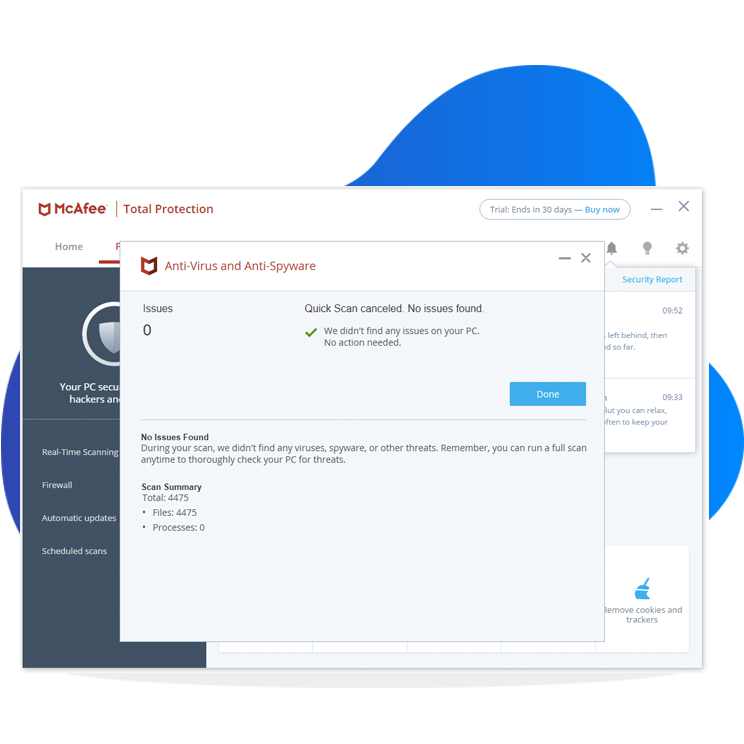
5. Once completed you will see the Scanning finished screen as shown in the following screenshot:
6. Now close the McAfee Antivirus console screen/application.
You have now successfully checked that your McAfee antivirus is enabled and up to date.
Norton 
If you have Norton installed on your PC or laptop, then follow the steps below to ensure that it is running the latest versions.
Click to Zoom
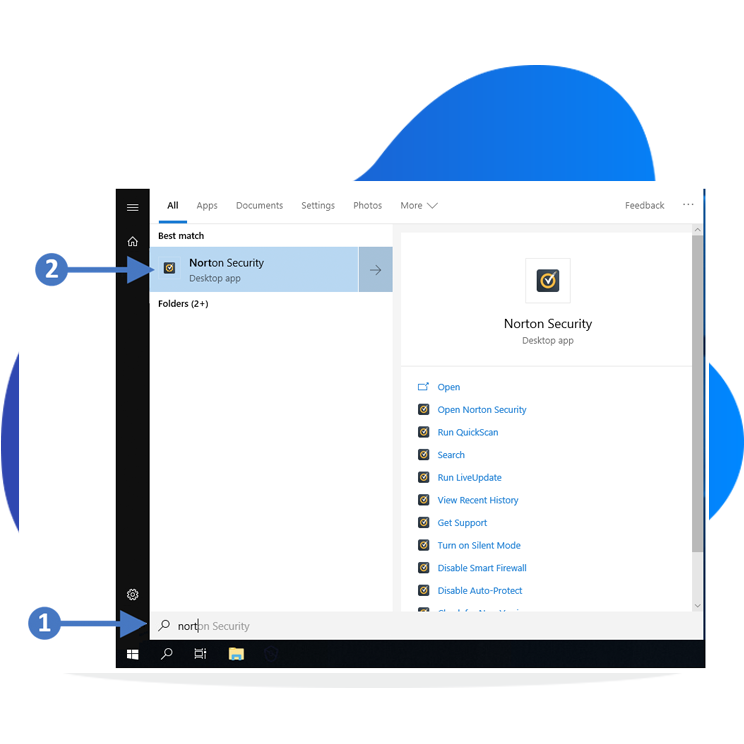
1. Press the Windows key on your keyboard and then start to type in "Norton" in the search box highlighted (1). You will then see the Norton Security appear at the top of the list as the best match, highlighted (2). Click on Norton Security to launch it as shown in the following screenshot:
Click to Zoom
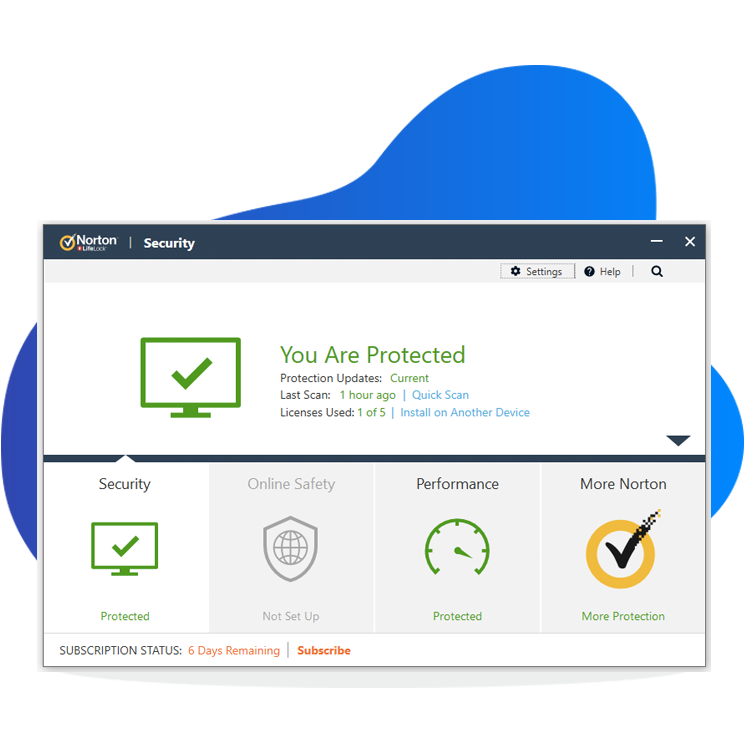
2. You will now see the Norton Security console screen as shown in the following screenshot:

Click to Zoom
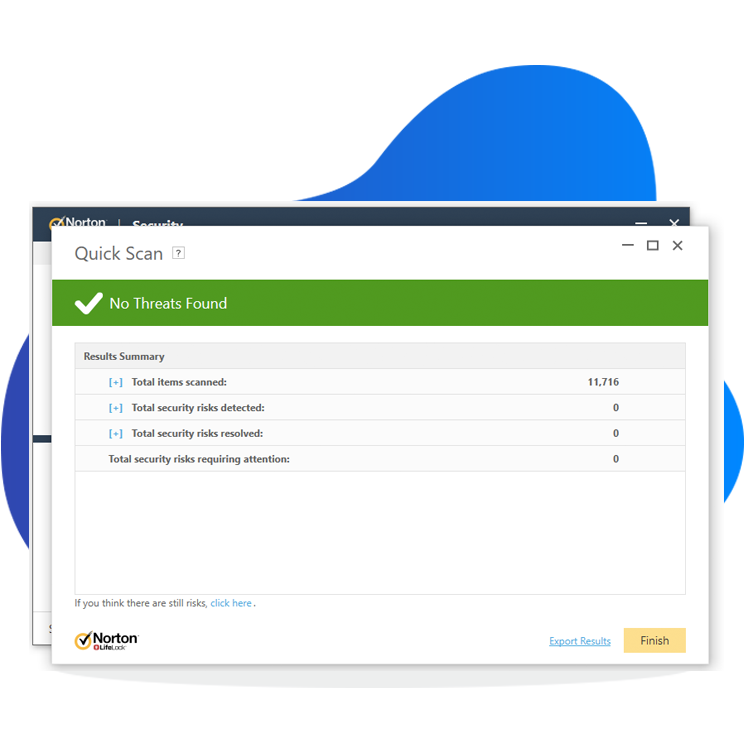
3. Click Quick Scan (3) to start scanning your PC.

Click to Zoom
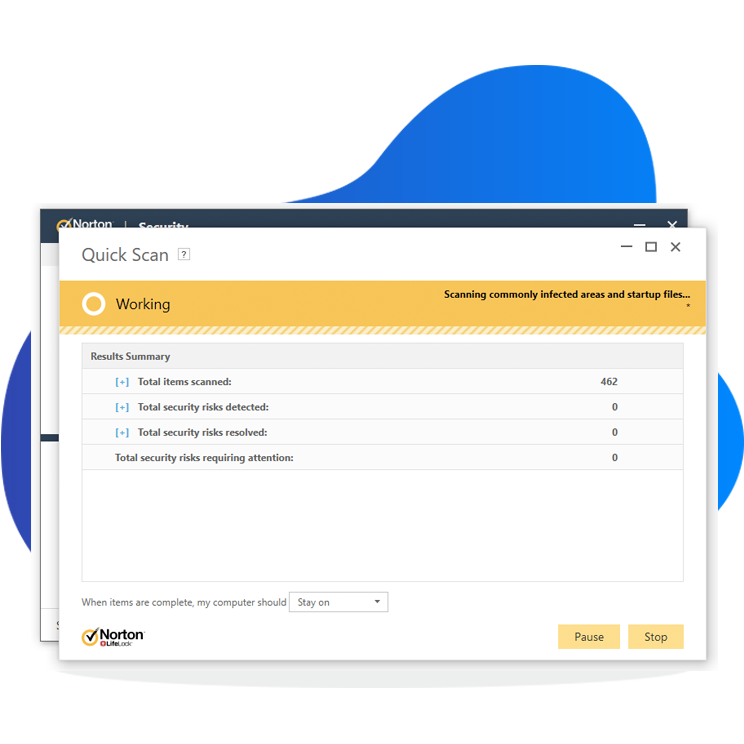
4. You will now see the scan process start, showing the current progress as shown in the following screenshot:
Click to Zoom
5. Once completed you will see the Scanning finished screen as shown in the following screenshot:
Click to Zoom
6. Now close the Norton Antivirus console screen/application.
You have now successfully checked that your Norton antivirus is enabled and up to date.
Avast 
If you have Norton installed on your PC or laptop, then follow the steps below to ensure that it is running the latest versions.
Click to Zoom
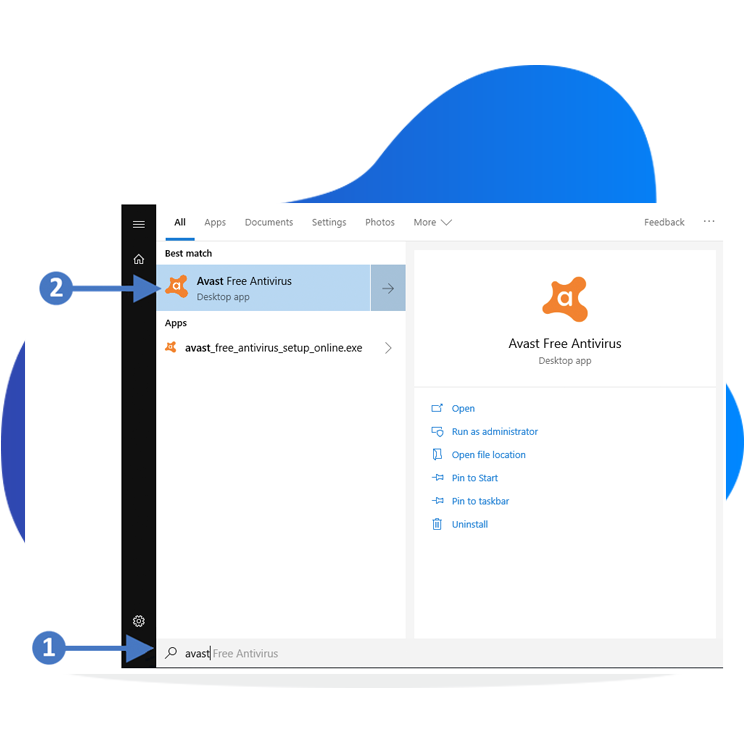
1. Press the Windows key on your keyboard and then start to type in "avast" in the search box highlighted (1). You will then see the Avast Free Antivirus appear at the top of the list as the best match, highlighted (2). Click on Avast Free Antivirus to launch it as shown in the following screenshot:
Click to Zoom
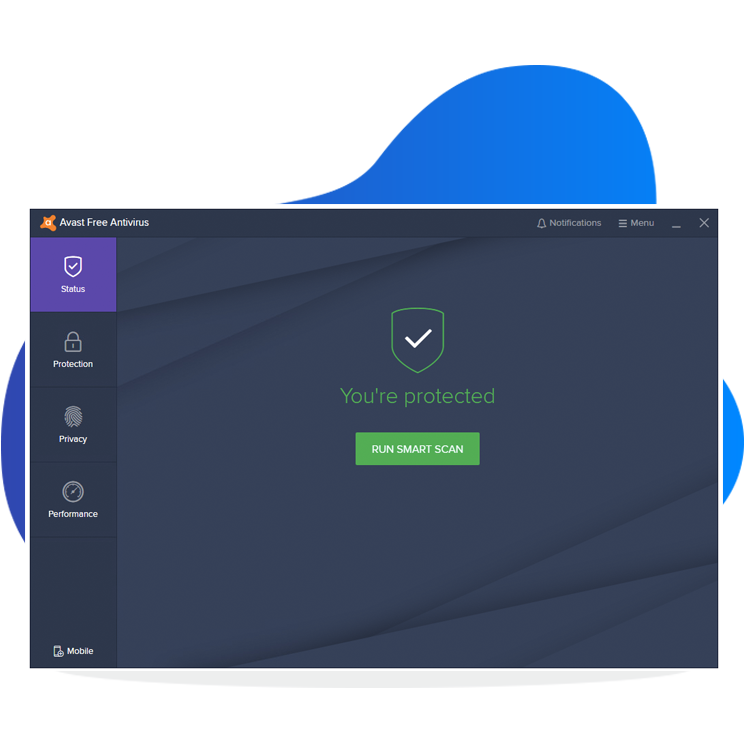
2. You will now see the Avast Free Antivirus console screen as shown in the following screenshot:

Click to Zoom
3. Click Run Smart Scan (3) to start scanning your PC.
Click to Zoom
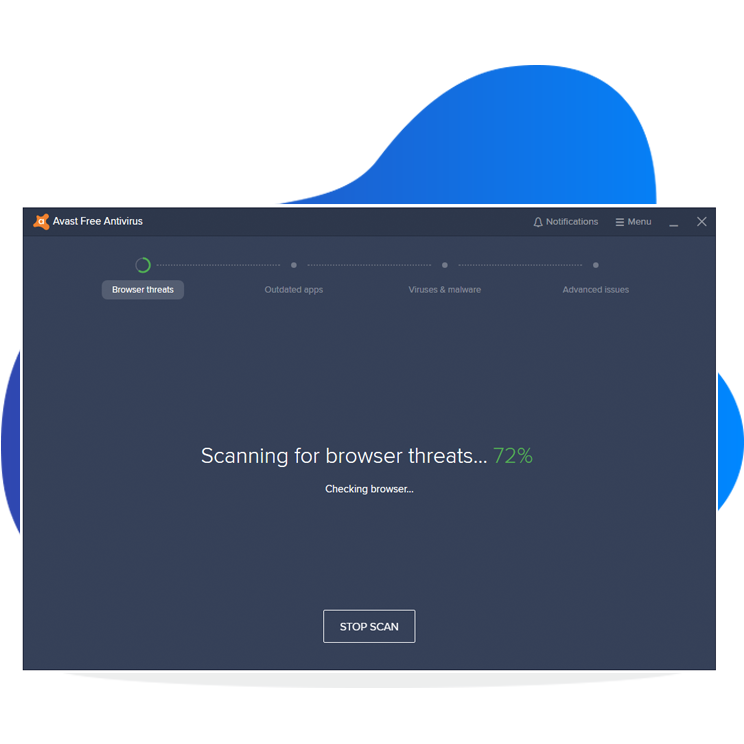
4. You will now see the scan process start, showing the current progress as shown in the following screenshot:

Click to Zoom
5. Once completed you will see the Scanning finished screen as shown in the following screenshot:
6. Now close the Avast Antivirus console screen/application.
You have now successfully checked that your Norton antivirus is enabled and up to date.
Updating the Windows operating system
About this Page
One of the first things you need to do on your Windows PC is to check that it is running the most up to date version of the operating system. In this article, we are going to walk you through checking your operating system to ensure you have downloaded and installed all the latest patches and updates.
What is Windows Update?
Windows Update is a built-in feature of the Windows operating system that checks online as to whether or not you have the latest version of your operating system installed on your PC. This check is important as it can also contain security updates and patches to fix potential vulnerabilities in the operating system. It could also add the latest new features. As part of the update process, any new files will be automatically downloaded and installed on your PC. It's important to follow the update instructions as often your PC will reboot several times while applying these updates.
If you are running updates on a Windows laptop PC then it is often important to leave the laptop plugged into the mains supply so that it has an uninterrupted power supply during the updates.
Checking & updating Windows 10
In this section, we are going to look at checking and installing updates for the Windows 10 operating system. Follow the steps below to work through the process of enabling the firewall:
Click to Zoom
1. Press the Windows key on your keyboard and then start to type in "settings" in the search box highlighted (1). You will then see the Settings App appear at the top of the list as the best match, highlighted (2). Click on the Settings App to launch it as shown in the following screenshot:
Click to Zoom
2. You will now see the Windows Settings screen as shown in the following screenshot:
3. Click on the option for Update & Security as highlighted (3) in the above screenshot. You will now see the Windows Update screen as shown in the following screenshot:
Click to Zoom
4. Click the Check for updates button as highlighted (4) in the above screenshot. This will check in with the update sites and the report back on any available updates.
Note: For the Windows Update feature to work and to be able to check for updates, your PC will need to be connected to the internet.
Click to Zoom
5. While checking for updates you will see the following screenshot:
Click to Zoom
6. When the search for updates has completed, then you will see a list of the updates that are available for download and install. The following screenshot shows an example of available updates:
7. Click on the Install now button highlighted (5) in the above screenshot. This will start the update installation.
Note: For the Windows Update feature to work and to be able to check for updates, your PC will need to be connected to the internet.
Click to Zoom
8. Once the installation has completed then you will need to restart your PC as shown in the following screenshot:
9. Click on the Restart now button to restart your PC.
You have now successfully updated your Windows 10 PC or laptop. It's worth setting up regular updates to ensure that your PC is always up to date